
Every developer has had that heart-stopping moment. "Wait, I deleted all that data, so why is my hard drive still screaming for space? 😱" This mysterious situation is especially common when you're working with multi-gigabyte MySQL databases in a Docker environment. You `DROP` the schema, delete the volume, and meticulously clean up with `docker system prune`, but your local disk space refuses to budge. It's as if the data has become a ghost, haunting your drive. But don't worry. This isn't a bug, nor is it a ghost. It's a problem you can easily solve by understanding how Docker works. In this article, we'll unravel that mystery and show you exactly how to reclaim your precious disk space.
1. Why Doesn't the Space Return? The Culprit is the 'Virtual Disk' 🕵️♀️
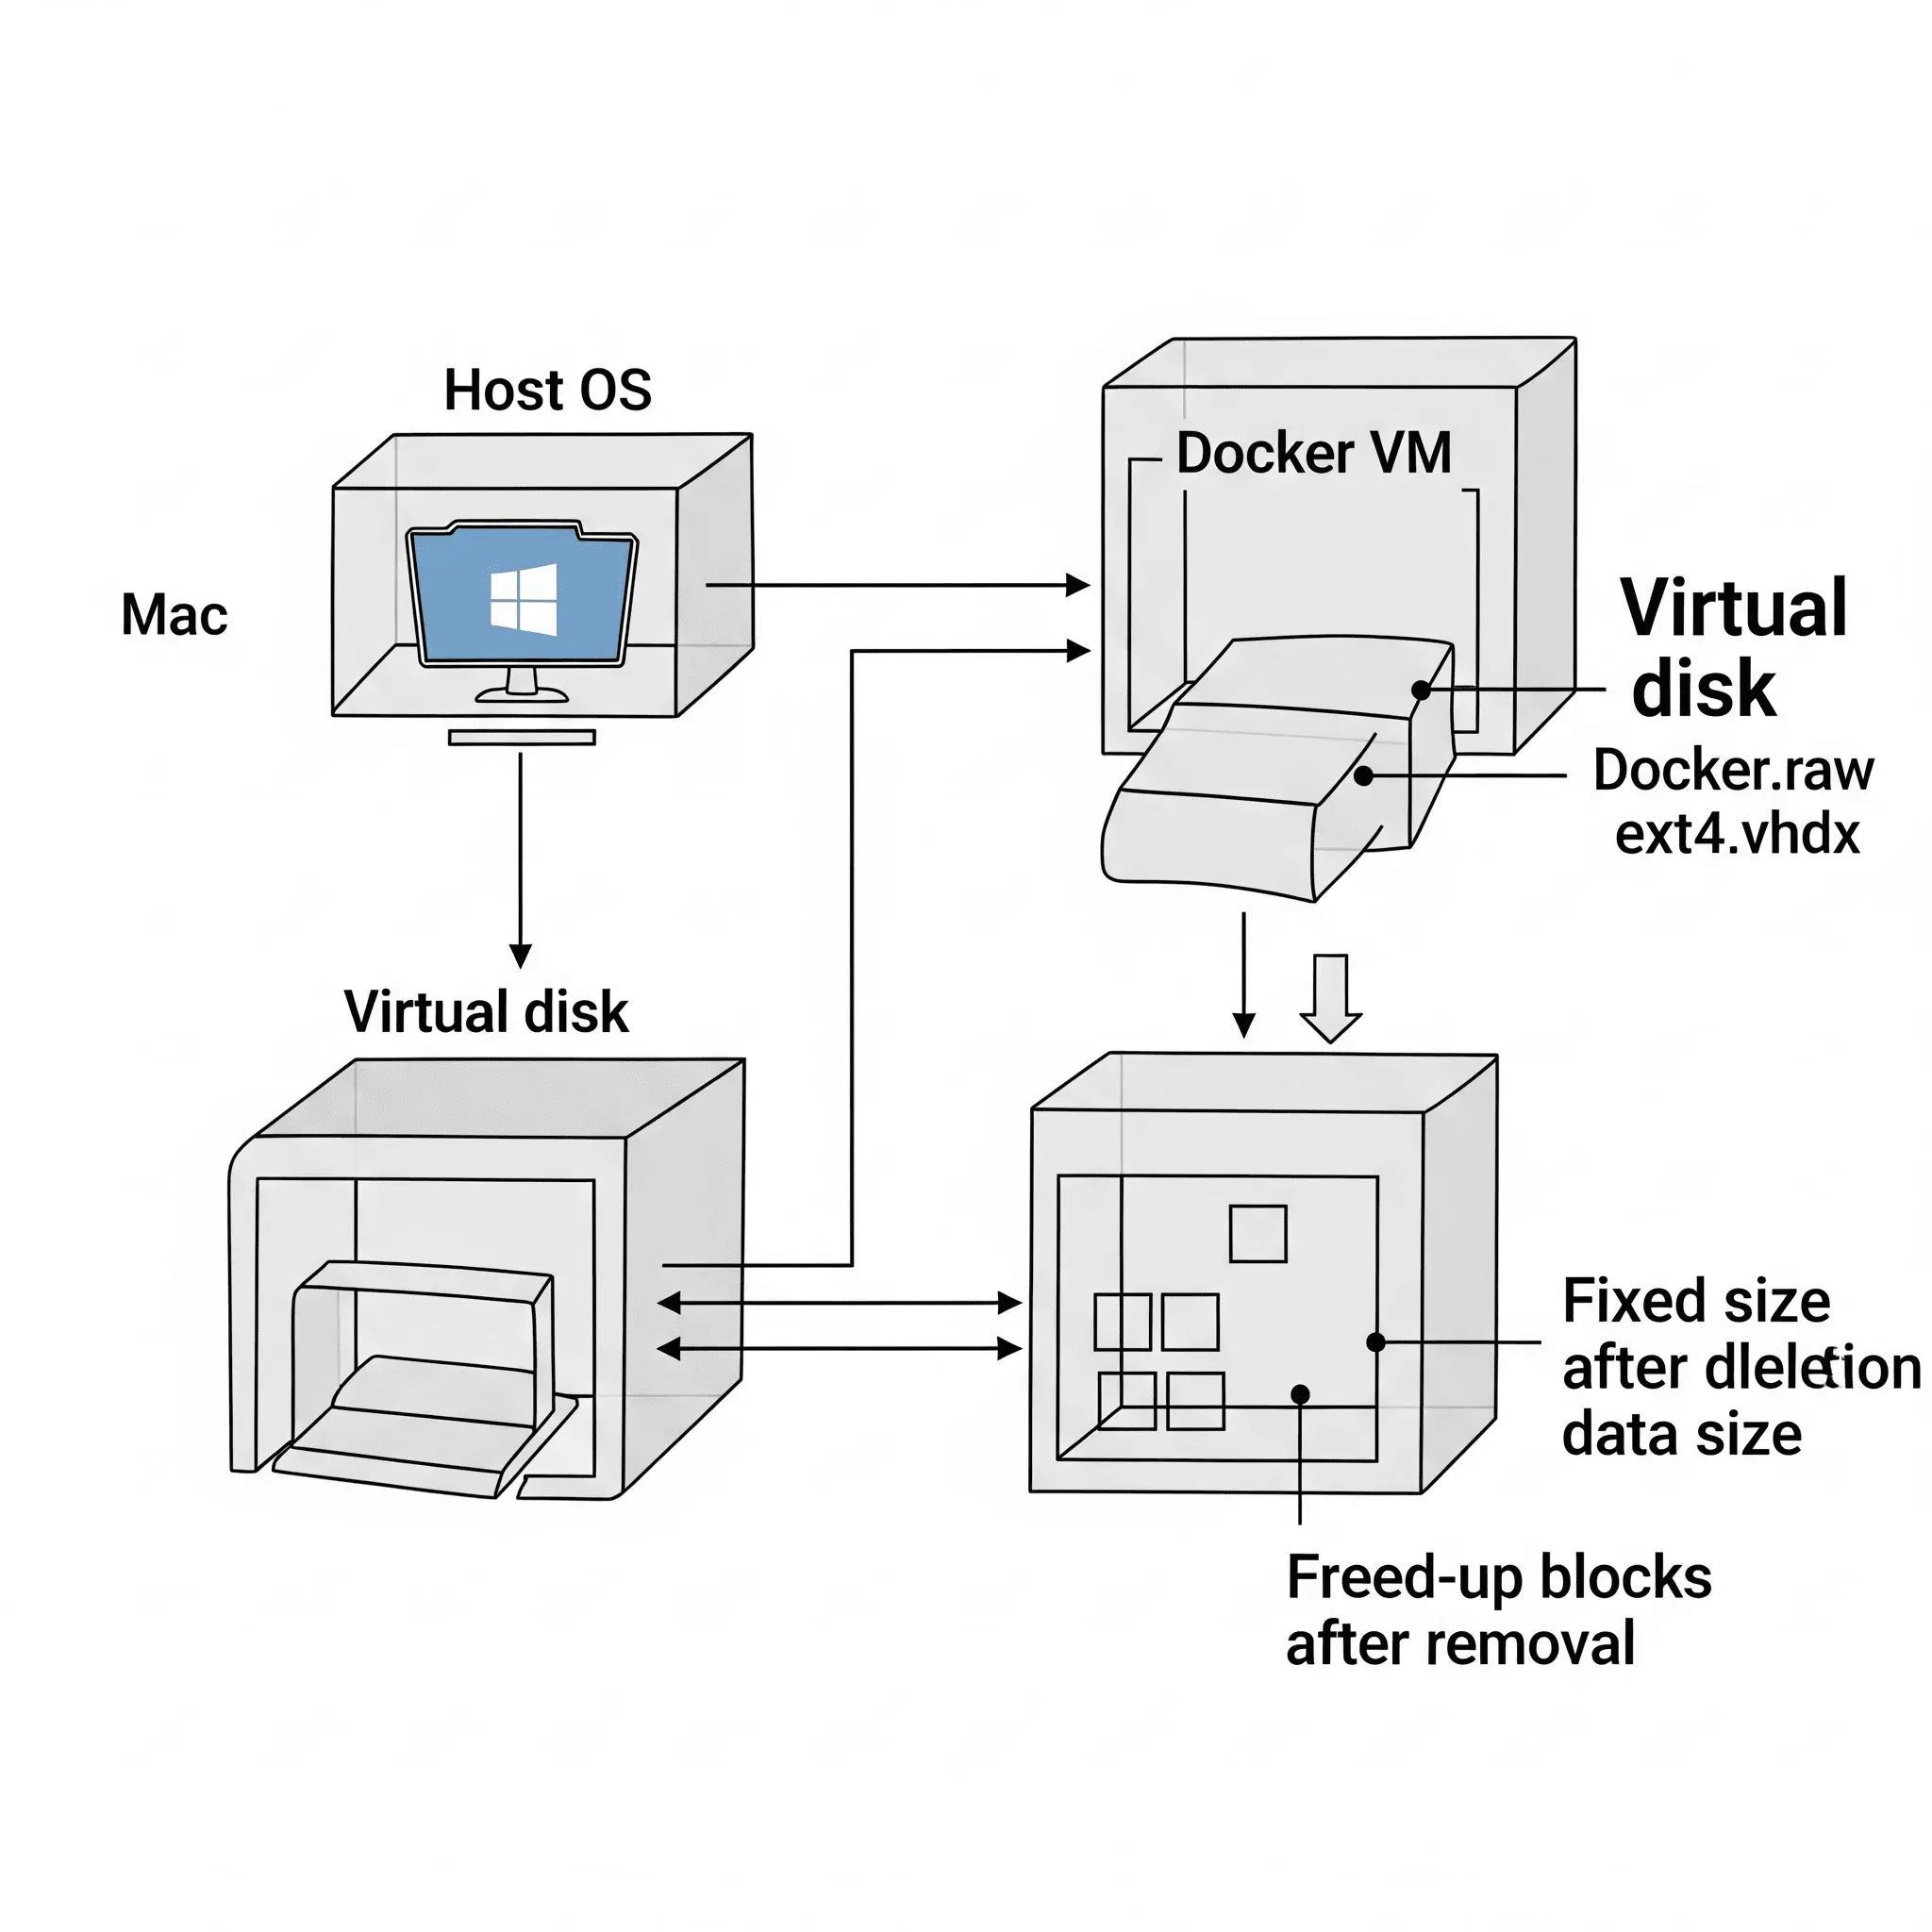
To understand the core of this issue, we need to take a quick look at how Docker Desktop (for Mac and Windows) works. Docker Desktop creates a Linux virtual machine (VM) inside our computer and runs containers within it. This means your MySQL container and its data are actually stored inside this VM.
And this virtual machine exists as a single, giant file. On Mac, it's called `Docker.raw`; in a Windows WSL2 environment, it's `ext4.vhdx`. Let's call this the 'virtual disk'.
Herein lies the magic trick. This virtual disk file can automatically 'grow' in size as needed, but it doesn't automatically 'shrink' when you delete content from within it. 🤯
"Think of it like an ever-expanding rubber balloon. When you blow air into it (write data), it gets bigger. But if you let a little air out (delete data), the balloon's size stays the same. Not until someone squeezes it from the outside."
When we use a command like `DROP SCHEMA` to nuke a database, the filesystem *inside* the virtual disk says, "Okay, this space is now free. Other data can be written here." But the virtual disk file itself insists, "I've grown this big once, so I'll maintain this size." From your host OS's (your Mac or Windows) perspective, this giant file is still taking up all that space.
2. First Aid: `docker system prune` (But It's Not Enough)
If you search for Docker space issues, the first solution you'll find is `docker system prune`. It's an incredibly useful command, of course. It cleans up all unused containers, networks, images, and even build cache in one go.
# Deletes all stopped containers, unused networks, dangling images, and build cache.
docker system prune -a

# In addition to the above, it also deletes all volumes not used by at least one container.
# Warning: Be careful with this command, as it can delete volumes with important data.
docker system prune -a --volumes
Running this command will certainly reclaim some space. However, it's not the fundamental solution to our 'space not reclaimed after deleting a large DB' problem. That's because the `prune` command only cleans up the trash *inside* Docker; it can't reduce the size of the virtual disk file itself once it has grown.
Key Takeaway
docker system prune is for cleaning the house (the VM), but our job is to shrink the house itself (the virtual disk file).
3. The Real Solution: Putting Your Virtual Disk on a Diet (Mac & Windows) 💪
Alright, let's get to the main event. It's time to trim the fat from our bloated virtual disk. The process differs slightly depending on your operating system. Follow the instructions for your environment.
🍎 For Mac Users
On a Mac, the process involves directly accessing the Docker VM and issuing a `TRIM` command to say, "Hey, this space is empty!" It used to be quite complex, but nowadays it can be solved with built-in features in Docker Desktop or a simple command.
Method 1: Using the Docker Desktop GUI (Easiest)
If you're using a recent version of Docker Desktop, this is the first thing you should check.
- Run Docker Desktop and click the Docker icon in the top menu bar.
- Go to Settings > Resources.
- Look for a button like 'Compact' or 'Reclaim space' near the 'Disk image size' section.
- If you see the button, click it! Docker will automatically optimize the virtual disk for you.
Method 2: Running TRIM Manually with a Terminal Command
This is for those who don't have the GUI feature or prefer working in the terminal. The principle is to use a special container provided by Docker to run the `fstrim` command inside the VM.
Open your terminal and enter the command below.
# 1. Run a container with special privileges to enter the Docker VM's namespace.
docker run --rm -it --privileged --pid=host justincormack/nsenter1 /bin/sh

# --- You are now inside the container's shell. ---

# 2. Issue the TRIM command to discard free blocks in the filesystem.
# /var/lib/docker is Docker's default data path.
fstrim -v /var/lib/docker

# 3. Once the job is done, type 'exit' to leave the container.
exit
When the `fstrim` command executes, it will print information about the amount of space it has reclaimed. After this process, you should be able to see the size of the `~/Library/Containers/com.docker.docker/Data/vms/0/data/Docker.raw` file decrease in Finder. 🎉
🖥️ For Windows (WSL2) Users
Docker Desktop on Windows runs on the Windows Subsystem for Linux 2 (WSL2). Therefore, we need to optimize the WSL2 virtual disk (`ext4.vhdx`).
First, open PowerShell with administrator privileges. (Search for PowerShell in the Start Menu, right-click, and select 'Run as administrator').
Step 1: Shut Down WSL Completely
Before we can manipulate the virtual disk file, we must completely shut down WSL to ensure the file is not in use. It's safest to close Docker Desktop as well.
wsl --shutdownStep 2: Find the Virtual Disk File Path
The path is typically as follows, but it's always a good idea to verify it in File Explorer as it can vary by user.
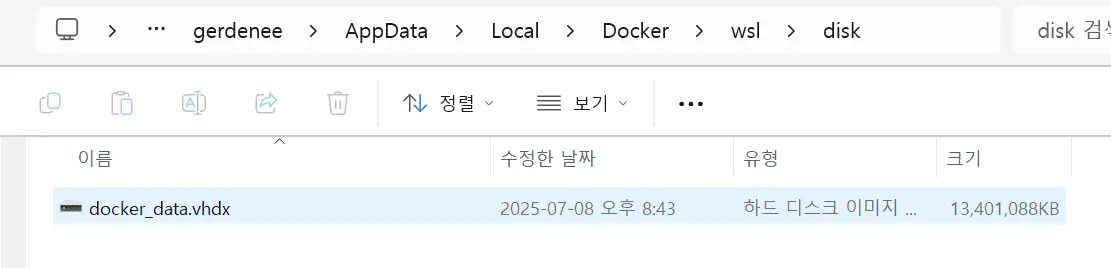
%USERPROFILE%\AppData\Local\Docker\wsl\data\ext4.vhdx
Example: C:\Users\Gardenee\AppData\Local\Docker\wsl\data\ext4.vhdx
Step 3: Run the Virtual Disk Optimization
There are two methods, but using `Optimize-VHD` is more straightforward and powerful on modern Windows systems.
Method A: Using `Optimize-VHD` (Recommended)
# Make sure to replace 'YOUR_USER_NAME' with your actual username.
Optimize-VHD -Path "C:\Users\YOUR_USER_NAME\AppData\Local\Docker\wsl\data\ext4.vhdx" -Mode Full
When you run this command, the optimization process will begin. It might take a few minutes depending on the file size. Once complete, the prompt will reappear without any specific message.
Method B: Using `diskpart` (The Classic Way)
If you're on an older version of Windows that doesn't have the `Optimize-VHD` command, you can use `diskpart`.
# Run diskpart
diskpart

# --- You are now in the diskpart prompt. ---

# 1. Select the virtual disk file. Double-check the path.
select vdisk file="C:\Users\YOUR_USER_NAME\AppData\Local\Docker\wsl\data\ext4.vhdx"

# 2. Attach the disk as read-only.
attach vdisk readonly

# 3. Run the disk compaction (optimization).
compact vdisk

# 4. Detach the disk.
detach vdisk

# 5. Exit diskpart.
exit
After completing the process, restart Docker Desktop. You'll feel a thrill of satisfaction seeing the drastically reduced size of the `ext4.vhdx` file in File Explorer! 😉
4. Prevention for the Future: Smart Docker Space Management Habits 💡
Fixing problems after they occur is important, but building good habits to prevent them is even better. Here are a few tips.
- Regular Pruning: While `prune` alone isn't enough for this specific issue, it's still crucial. Run `docker system prune` periodically to prevent unused Docker resources from piling up.
- Consider Bind Mounts: When dealing with very large, temporary data, using bind mounts instead of Docker volumes can be an option. Bind mounts store data directly on the host's filesystem, so deleting a file on the host immediately frees up space. (Of course, volumes are superior for portability and management, so choose based on your needs.)
- Multi-stage Builds: When creating Docker images, use multi-stage builds to ensure that libraries and tools needed only for the build process are not included in the final image. Small, clean images are fundamental to saving space.
- Periodic Disk Optimization: Especially if you frequently handle large datasets, making it a habit to run the virtual disk optimization process you learned today (e.g., once a month) is a great practice.
Conclusion: You Are Now the Master of Docker Space! 🥳
Docker's 'ghost space' mystery is now solved. The key takeaway is that "deleting data inside a container and shrinking the virtual disk file are two separate tasks." Now you clearly understand why the space wasn't reclaimed and how to actually get it back.
Remember what you've learned today, so the next time you face a similar situation, you can handle it elegantly with the calm of a seasoned pro and a cup of coffee in hand. Congratulations on becoming a developer who no longer stresses over sudden 'disk space low' warnings! 🚀